

What is this?
Platform Tickets is the built-in support desk for your platform. Users raise support requests, and those tickets appear here for your team to review, assign, reply to, and resolve — no external ticketing tool required.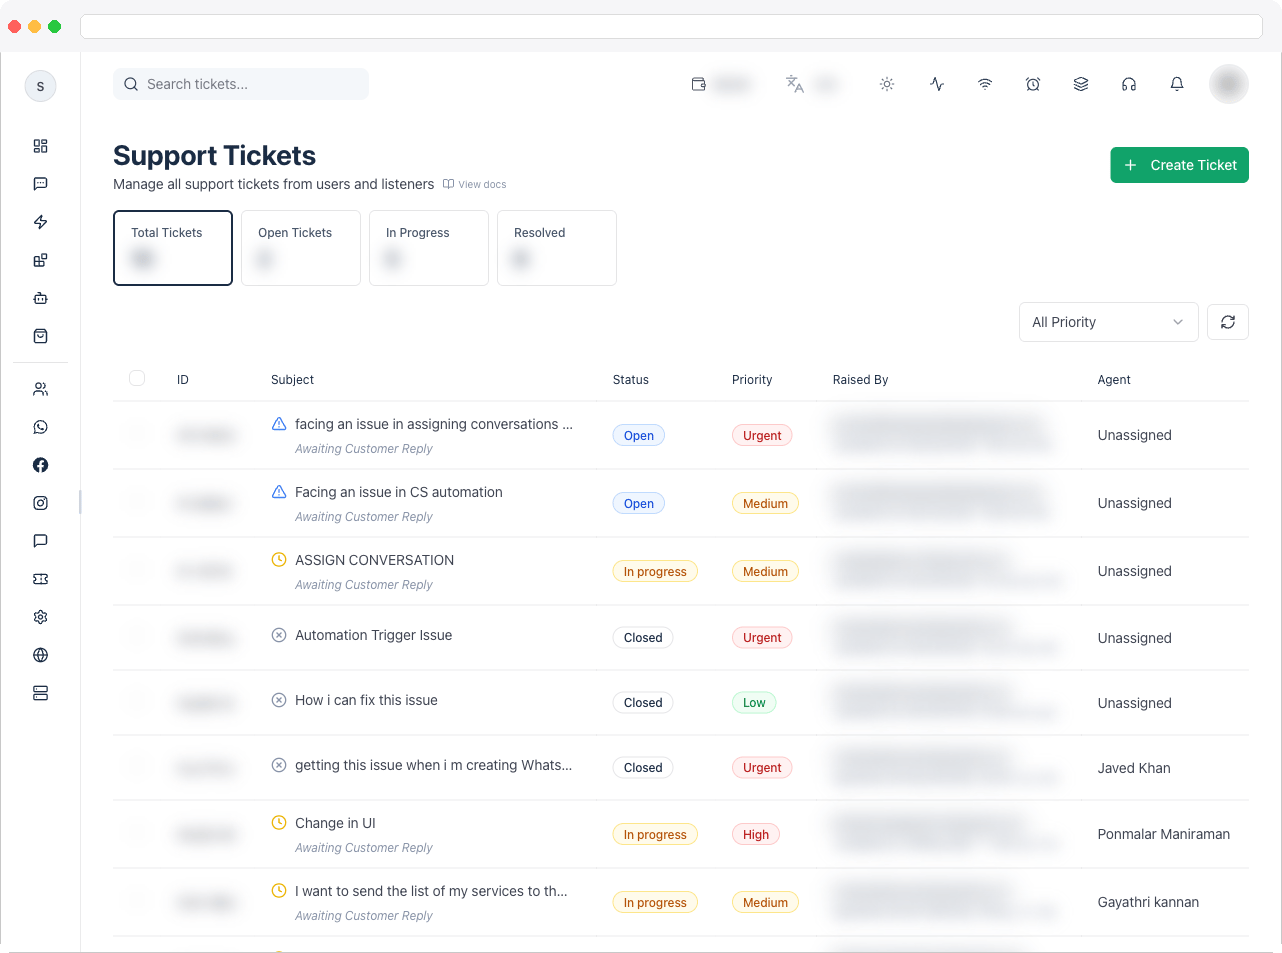
This page requires the
supporttickets:view permission. Replying to tickets requires platform:reply.What can I do here?
- See summary tiles: Total Tickets, Open Tickets, In Progress, and Resolved
- Search tickets and filter by Priority (Low, Medium, High, Urgent)
- Read each ticket’s Subject, Status, Priority, Raised By, and assigned Agent
- Open a ticket on its own page to see its Conversation, Customer detail (name, email, phone, and Plan), a Progress timeline, and the customer’s other tickets
- See whether a ticket is Waiting on support or Waiting on customer
- Reply to the user, or add an Internal Note that only your team can see
- Use Optimize to polish a reply before sending it
- Attach files to a reply
- Set a ticket’s Status, Priority, and Assigned To, click Resolve Ticket, or Delete it from the More options menu
- Select several tickets to Close Selected or Delete Selected
- Create Ticket — including on behalf of another admin user
How to use it
Work a ticket
- Go to Platform → Platform Tickets and click a ticket. It opens on its own page, with Customer’s tickets on the left, the conversation in the middle, and a details panel on the right.
- Read the conversation — the customer’s original request comes first, then every reply and internal note, grouped by day. A status line at the end shows Waiting on support, Waiting on customer, Marked as resolved, or This ticket is closed.
- In the details panel, change the Status (Open, In Progress, Resolved, or Closed), Priority, and Assigned To. Only owners and super admins can assign a ticket; set it to Unassigned to clear it. Use Customer detail to see who raised it and their Plan, and Progress to follow what has happened.
- Under the reply box, the Reply tab sends a public reply. Type your response and press Enter to send (Shift + Enter for a new line). Replies must be at least 15 characters.
- To leave a private message for your team, switch to the Internal Note tab before sending. Only your team can see internal notes.
- When the issue is fixed, click Resolve Ticket.
When you reply, the user is automatically notified by email. Closed tickets can’t receive new replies.
First reply claims the ticket. When you send the first public reply (not an internal note) on someone else’s Open ticket, the ticket automatically moves to In Progress and is assigned to you. Replying on your own ticket, or with an internal note, doesn’t do this.
Create a ticket
- Click Create Ticket.
- Enter a Title and Description, and attach a file if attachments are required (see Support Ticket Settings). You can paste screenshots directly into the description.
- To open the ticket for someone else, choose them under Create on behalf of; otherwise it is created as Yourself (default).
- Click Create.
Set ticket options
Automatic first replies, automatic closing after a ticket is resolved, and whether an attachment is required on new tickets are configured in Support Ticket Settings.Troubleshooting / Technical Notes
- “Reply too short.” Replies need at least 15 characters.
- “Attachment required.” Your platform requires an attachment on new tickets. Add at least one file, or turn the requirement off in Support Ticket Settings.
- I can see tickets but can’t reply. Replying needs the
platform:replypermission. - A ticket can’t be replied to. Closed tickets don’t accept replies. Create a new ticket instead.
- External notifications. Ticket events can trigger webhooks (for example to send a WhatsApp message) — see Webhook Integration.